EmailPoint offers creating and customizing email templates to suit your brand’s needs. We have prepared over 120 ready templates, you can simply adjust for your brand to save time.
Follow this guide to design and personalize your email templates effectively.
Step 1: Access the Template Library
- Log In: Navigate to EmailPoint.net and enter your credentials to access your account.
- Navigate to Templates: In the main dashboard, click on the Templates section to view the available templates.
Step 2: Create a New Template
- Start a New Template: Click on Create New Template and Add a name to begin designing.
- Choose a Starting Point: Select from:
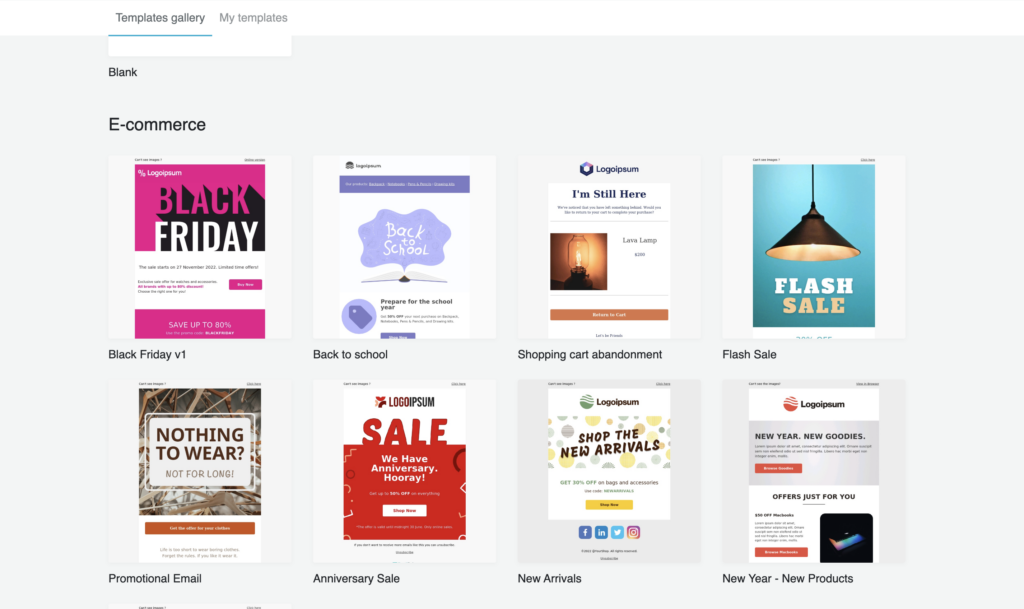
- Pre-designed Templates: Professionally designed layouts ready for customization. After you have named your template, you will be redirected to our Template Gallery. You can choose between multiple categories like E-commerce, Events, Holiday, Offers and Deals, Newsletters and other. Simply find the design you like and click “Choose” to edit it and customize for your business in our Drag&Drop Editor.
- Blank Template: Start from scratch for complete design freedom with our Drag&Drop Editor. You can choose from a list of Widgets like Text, Image, Header, Button, Divider, Image Hover etc. On the right menu you can choose colors, upload images and change the Width of each element.

Step 3: Customize the Template
- Use the Drag & Drop Editor: EmailPoint’s intuitive editor allows you to add various elements:
- Text Blocks: Click and drag to add text areas.
- Images: Insert images by dragging the image block.
- Buttons: Add call-to-action buttons.
- Dividers: Separate sections with divider lines.
- Edit Elements: Click on any element to modify its content, style, and alignment.
- Adjust Layout: Rearrange elements by dragging them to the desired position.
- Apply Styles: Customize fonts, colors, and backgrounds to align with your brand identity.
Step 4: Manage Images with the File Manager
- Access File Manager: Click on the image block to open the File Manager.
- Upload Images: Upload new images from your computer.
- Organize: Create folders to keep your images organized for easy access.
Step 5: Utilize the HTML Editor (Optional)
- Switch to HTML Editor: For advanced customization, click on the HTML Editor tab.
- Edit Code: Directly modify the HTML and CSS to achieve precise design requirements.
Step 6: Preview and Test
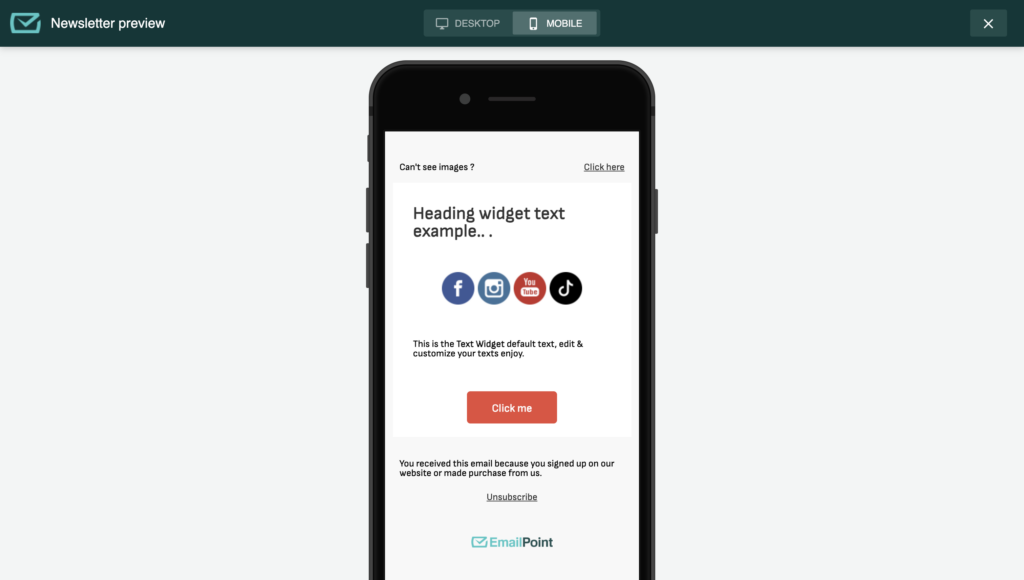
- Preview: Click on the Preview button to see how your email will appear on Desktop and Mobile.
- Send Test Email: Use the Send Test feature to send a test email to yourself or a colleague.
Step 7: Save and Use the Template
- Save Template: Once satisfied with the design, click Save and provide a name for your template.
- Apply to Campaigns: Your saved template will now be available in the Templates section for use in future email campaigns.
By following these steps, you can create customized email templates in EmailPoint that effectively represent your brand and engage your audience.